

Planning the perfect picnic means finding foods that are delicious, portable, and crowd-pleasing. Whether you’re heading to the park with family or enjoying a romantic outdoor lunch, the right picnic recipes can transform your experience. This comprehensive guide covers everything from savory snacks and portable desserts to fresh salads and flavorful dips—all designed to travel well and taste amazing.
Essential Tips for Planning the Perfect Picnic
Choosing the Right Picnic Foods
The best picnic foods are portable, stay fresh at room temperature, and aren’t messy to eat. When selecting your menu, consider:
- Portability: Foods that hold their shape and don’t require extensive setup
- Temperature stability: Dishes that taste good cold or at room temperature
- Variety: A mix of textures (crunchy, creamy, soft) and flavors (savory, sweet, spicy)
- Easy eating: Finger foods or dishes that don’t require complicated utensils
Choose recipes that can be prepared in advance and pack well in containers to minimize stress on picnic day.
Food Packing and Transportation Tips
Proper food packing and storage techniques ensure your picnic food arrives fresh and appetizing:
- Use airtight containers to prevent spills and maintain freshness
- Pack greaseproof paper or parchment between layers
- Invest in a quality insulated cooler or picnic basket
- Wrap delicate items like salads separately to prevent wilting
- For warm dishes, use insulated food carriers or thermal bags
- Layer ice packs throughout your cooler for even temperature distribution
Smart packing keeps your food at the right temperature and prevents cross-contamination.
Food Safety Guidelines for Outdoor Dining
Food safety is crucial when eating outdoors. The USDA recommends these guidelines:
- Keep it cold: Use ice packs or coolers for perishable items like dairy, meat, and seafood
- Minimize sun exposure: Store your cooler in the shade and limit how often you open it
- Prep fresh: Prepare food as close to departure time as possible
- Practice hygiene: Bring hand sanitizer and clean utensils following FDA food safety guidelines
- Follow the 2-hour rule: Discard perishable foods left at room temperature for over 2 hours (1 hour if it’s above 90°F)
Savory Picnic Recipes: Homemade Scotch Eggs
How to Make Perfect Scotch Eggs
Scotch eggs are the ultimate picnic food—crispy on the outside, savory sausage in the middle, and a perfectly cooked egg at the center. Professional chefs recommend this technique for achieving perfect results:
Step 1: Cook the eggs
- Boil eggs for exactly 4½ minutes for a slightly runny yolk
- Immediately transfer to an ice bath to stop cooking
- This makes peeling easier and ensures the perfect texture
Step 2: Prepare the sausage mixture
- Mix ground sausage with seasonings (salt, pepper, herbs)
- Optional additions: black pudding, grated apple for sweetness, or spices
- Flatten into thin patties large enough to wrap around each egg
Step 3: Wrap and coat
- Wrap each peeled egg completely with the sausage mixture, ensuring no gaps
- Set up a breading station: flour, beaten egg, and breadcrumbs
- Roll each wrapped egg in flour, dip in egg wash, then coat thoroughly in breadcrumbs
- Pro tip: Use panko breadcrumbs for extra crispiness
Step 4: Fry to perfection
- Heat oil to 350°F in a deep pan
- Fry for 10-12 minutes, turning occasionally for even browning
- The sausage should be fully cooked while the egg yolk remains soft
- Drain on paper towels
Scotch Egg Variations and Tips
Customize your Scotch eggs with these ideas:
- Spice it up: Add curry powder, paprika, or cayenne to the sausage
- Cheese lovers: Mix grated Parmesan or cheddar into the breadcrumbs
- Herb garden: Add fresh thyme, sage, or rosemary to the coating
- Lighter option: Bake at 400°F for 25-30 minutes instead of frying
Expert tips for success:
- Ensure even coating to prevent oil absorption and ensure crispiness
- Let them cool completely before packing for optimal texture
- They taste delicious both warm and cold
Serving Scotch Eggs at Your Picnic
Scotch eggs are incredibly versatile:
- Serve as a substantial snack or main course
- Pair with fresh salads, pickles, or mustard
- They’re perfect finger food—no utensils needed
- Pack individually wrapped for easy serving

Easy No-Bake Picnic Desserts
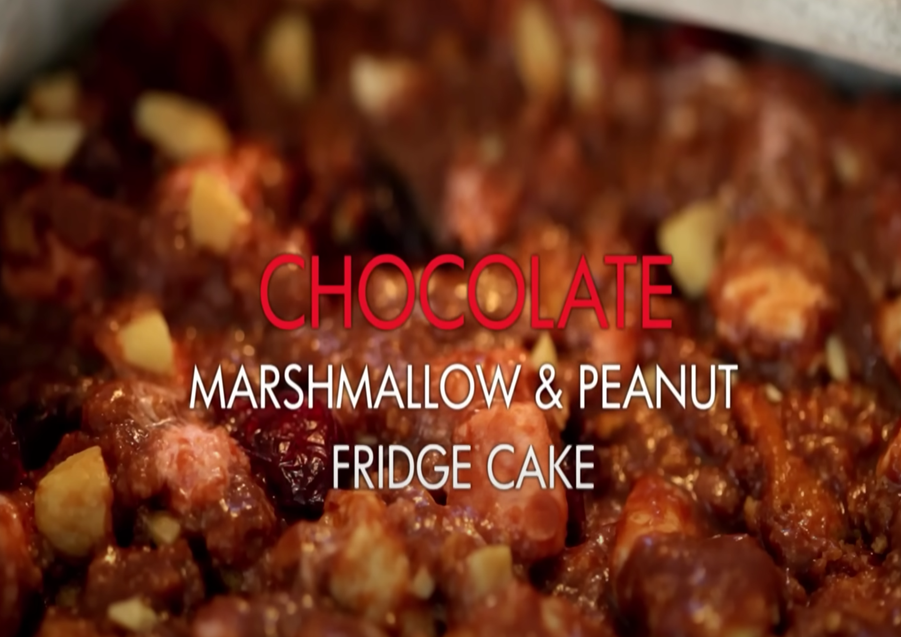
Chocolate Fridge Cake Recipe
This no-bake dessert is a picnic favorite—easy to make, portable, and always a crowd-pleaser.
Ingredients and method:
- Melt chocolate with butter and golden syrup using a double boiler or microwave (30-second intervals)
- Crush digestive biscuits or graham crackers into various-sized pieces
- Add mix-ins: mini marshmallows, dried cranberries, chopped nuts, or dried fruit
- Fold everything together until well combined
- Press firmly into a parchment-lined pan
- Refrigerate for 3-4 hours until completely set
- Cut into squares or bars for serving
Customizing Your Fridge Cake
Make it your own with these variations:
- Allergy-friendly: Use gluten-free biscuits or nut-free ingredients (learn more about food allergies and dietary restrictions)
- Flavor twists: Add orange zest, peppermint extract, or espresso powder
- Texture variations: Include toasted coconut, Rice Krispies, or pretzels
- Dietary options: Use dark chocolate for a less sweet version
More Portable Dessert Ideas
Other no-bake desserts perfect for picnics:
- Fruit parfaits: Layer yogurt, granola, and fresh berries in mason jars
- Cookie bars: Press cookie dough into a pan and cut into squares
- Energy balls: No-bake bites made with dates, nuts, and oats
- Brownie bites: Dense brownies that travel well and won’t crumble
Flavorful Dips and Spreads for Sharing
Savory Anchovy and Olive Tapenade
This Mediterranean-inspired dip is bold, flavorful, and perfect for picnic snacking.
Recipe:
- Blend garlic cloves, shallots, anchovies, and pitted black olives
- Add fresh parsley and a generous drizzle of olive oil
- Pulse until smooth or leave slightly chunky for texture
- Season with black pepper (anchovies provide salt)
- Store in a sealed jar for easy transport
Serving suggestions:
- Crispy breadsticks or baguette slices
- Fresh vegetables: carrots, celery, radishes, bell peppers
- Crackers or pita chips
- The salty-savory flavor pairs beautifully with fresh crudités
Spicy Chili Yogurt Dressing
This versatile dressing adds a zesty kick to salads and vegetables.
Ingredients:
- Greek yogurt (creamy base)
- Fish sauce (umami depth)
- Fresh chili, finely chopped
- Fresh lime juice
- A pinch of sugar to balance
- Optional: minced garlic or fresh herbs
Packing tip: Mix in a mason jar with a tight lid—shake before serving to recombine.
What to Serve with Picnic Dips
Create a complete dipping spread:
- Assorted raw vegetables cut into sticks
- Variety of crackers and breadsticks
- Toasted pita wedges
- Fresh fruit for sweeter dips
- Cheese cubes for added protein
Fresh and Crunchy Picnic Salads
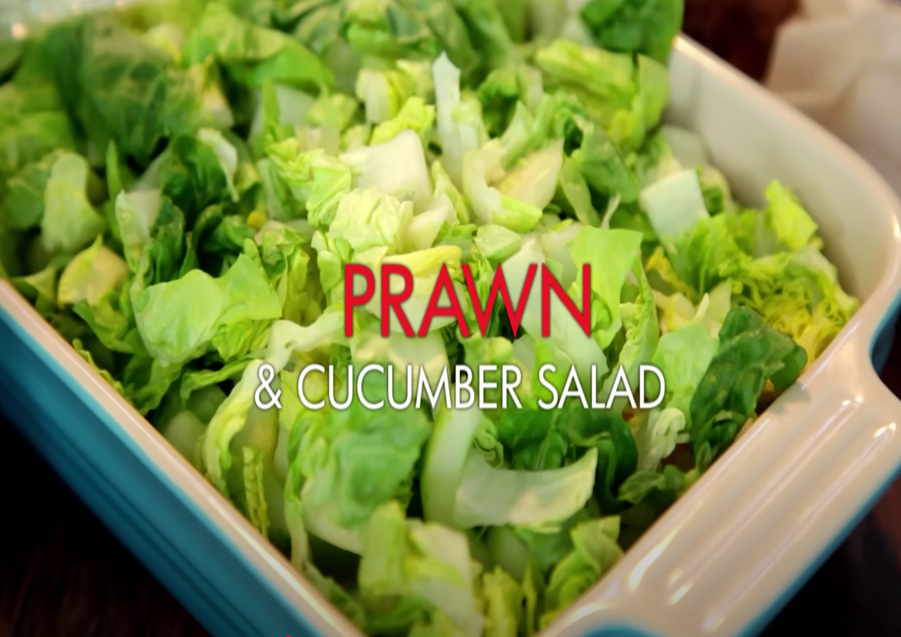
Refreshing Shrimp and Cucumber Salad
This light, protein-packed salad is ideal for warm-weather picnics.
Preparation steps:
For the salad:
- Peel and thinly slice cucumbers, removing seeds to prevent sogginess
- Use a mandoline or vegetable peeler for uniform slices
- Add butter lettuce or mixed greens, torn into bite-sized pieces
- Cooked shrimp, chilled
For the spicy yogurt dressing:
- Whisk together Greek yogurt, fish sauce, chopped chili, lime juice, and sugar
- Adjust seasoning to taste
Packing method:
- Place dressing at the bottom of your container
- Layer vegetables on top
- Add shrimp as the final layer
- This prevents soggy vegetables—mix just before serving
Tips for Keeping Salads Fresh
Maintain salad quality during transport:
- Use airtight containers to prevent wilting
- Pack leafy greens loosely to avoid crushing
- Keep dressing separate until ready to eat
- Store in the coolest part of your cooler
- Add ice packs around containers
Salad Variations and Add-Ins
Customize your picnic salad:
- Herbs: Fresh dill, cilantro, mint, or basil
- Fruits: Diced mango, sliced strawberries, or orange segments
- Proteins: Grilled chicken, hard-boiled eggs, chickpeas, or feta cheese
- Crunch: Toasted nuts, seeds, or crispy wonton strips
- Grains: Quinoa, couscous, or farro for a heartier option
Final Checklist for Picnic Success
Packing essentials:
- Compartmented containers to prevent food mixing
- Ice packs and insulated cooler
- Reusable plates, utensils, and napkins
- Wet wipes or hand sanitizer
- Trash bags for easy cleanup
- Blanket or portable chairs
Day-before preparation:
- Cook and prepare dishes that can be made ahead
- Wash and chop vegetables
- Mix dry ingredients for recipes
- Pack non-perishable items
Don’t forget:
- Colorful napkins or tablecloth for ambiance
- Bottle opener and cutting board if needed
- Music speaker for atmosphere
- Sunscreen and bug spray
Most importantly: Relax and enjoy the experience—perfection isn’t the goal, making memories is!
Conclusion: Create Your Perfect Picnic Menu
With these tried-and-tested picnic recipes and expert tips, you’re ready to host an unforgettable outdoor gathering. From crispy Scotch eggs and indulgent chocolate fridge cake to refreshing salads and bold dips, there’s something to satisfy every palate.
The beauty of homemade picnic food is the freshness, customization, and love that goes into every dish. These recipes are designed to be prepare-ahead friendly, travel well, and taste delicious whether served warm or cold. For more inspiration, explore additional picnic ideas from culinary experts.
So gather your favorite ingredients, pack your cooler, and transform any outdoor location into a culinary celebration. Your perfect picnic awaits—now it’s time to enjoy good food, great company, and the beauty of eating al fresco!